Lessons Learned Teaching Git
Published on
(Over and over and over)
Up until last month, and for a little over a year, I taught new developers in HTML, CSS, and JavaScript at The Iron Yard in Washington, DC - an immersive code school. Of course, teaching people new to the world of software development must necessarily entail teaching a lot more than just writing code. On day 1 we start working in Atom, for example. Any code editor can be a very foreign environment for these folks. But one of the most difficult concepts for my students to understand is source control - specifically Git.
This article is going to cover some of the largest issues I encountered teaching Git over and over, and some ideas that might help others when doing the same. While my most recent experience is with people completely new to development, I believe that these thoughts could still apply to developers coming from a lack of source control management or even from other source control management (SCM) tools (i.e. Subversion, Perforce, Bazaar, etc).
A Distributed System
When training the next generation of software developers we have to realize that computers have been an inherent part of their life for many years already. Even some of the older students I've had still used computers on a daily basis the last decade or two. This leads to two primary issues that I noticed:
- Coders don't type like other folks; and
- People rarely understand how file storage - especially distributed storage - works at a high level.
We'll ignore number one above for now, but I highly recommend new developers spend at least 30 minutes a day with a tool like typing.io to get those skills up. We use a lot of weird characters in software development, and a lot of indentation.
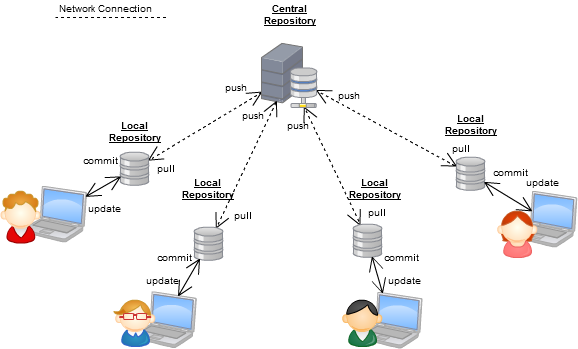
The second point above, however, is crucial to understanding Git as a distributed source control management tool. Most people that came to my classes were somewhat familiar with how to use things like Dropbox, Google Drive, OneDrive, iCloud, and any number of other such tools. They understand that they take a picture, create a document, or upload a file and that they can then share that with others, or retrieve it later themselves from another device. For example, I can take a picture on my phone and it automatically syncs with Dropbox, which automatically syncs with my laptop, so I can access it there almost right away. But what does that mean? Most muggles don't know.
Here's the key that people tend to miss: there isn't one picture in my example above, there are at least three. And while Dropbox has done this process automatically for us, with Git this is a manual process. This is the commit, push, pull sequence.
When teaching Git, one must get across this idea that our files are distributed across multiple machines, and that changing it on one of them will (eventually) change it on the others. This is great! And it is terrifying when you realize that you could have multiple - possibly way too many - people working on the same codebase at the same time. That's why it is so important to understand this process. For my new students, I tell them to over commit (see the next section), push on every commit, and pull before any merge/pull request/new branch/etc (and maybe before you start working each day just for funsies).
One of the biggest lessons I've learned from all of this is that it's very difficult to teach Git in pieces. Sometimes I have to get them to understand the basic mechanics at first, then explain the concepts over more time. There is a critical mass of commands that must be known at least on the surface level to understand those concepts.
A Flip Book of Code
Remember flip books? They are relatively small books where each page is a single image that differs only slightly from the one before (or after) it. The idea is simple: you "flip" through the pages, thus creating the illusion of motion. This was the earliest form of animation, and up until the digital age it was essentially how all animation was done. Our code commits in Git are a little like a flip book. Looking through them should show a progression of the story of our project.
As you may have guessed, the next most common issue I ran into was folks not understanding code commits. Specifically there were three things I kept getting asked:
- When should I commit?
- What should I commit?
- How do I describe my commit?
(In case you're keeping score of question words: the "Who" is generally pretty easy, and tracked by Git and in our case GitHub; and the "Where" is the subject of the first section up above. The "Why" I'll leave to you.)
The Three Seashells
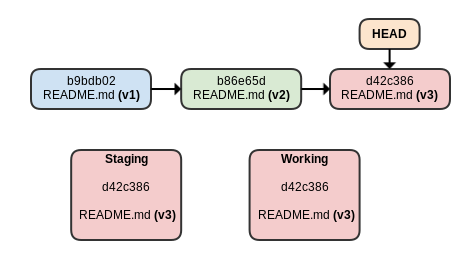
We first have to start with trying to discuss what a commit is exactly. I use this diagram to the left to start. The key here is that git maintains three different environments in which your code lives: the working directory (stuff you're typing), the staging area (stuff you have git added), and the branch. Understanding that a "commit" is a point in time within the branch's history is important. That said, this idea confuses students to no end.
One important aspect here is teaching students that, for now, they should not run git add . - not until they can control their workflow better. I'm not saying that it's purely forbidden in general, but for students it leads to a lack of understanding of the three environments Git maintains. That in turn confounds the answer to number two above: "What should I commit?". I make them add each file individually to start, then show them adding an entire directory much later.
What goes inside?
As I mentioned earlier, I first tell my students to commit constantly, pretty much any time they change anything. This mostly just gets them in the habit until I have a little more time to slow down and explain the concept of a commit. That is, that commits are "snapshots" of the entire project at a point in time. The concept I eventually want them to understand is that commits should reflect a "unit of work". While this sounds a bit vague (it is somewhat intentional), we then spend the rest of the course reviewing commits and fine-tuning that "unit of work" concept.
This idea answers number one and number two above: "what" you commit is a unit of work, the "when" depends on when you finish that unit. Of course, getting students to do this in practice is not an overnight change - it requires weeks, and for some, months, to really follow this pattern. The "how do I describe it" question becomes much more simple once we get the size of the commits down to a single unit of work, thus answering number three above. We go a little further here and talk about communicating with your team through the commit messages and trying to tell that flip book story by looking at git log --oneline.
Later in the course we also get into the idea of commits as atomic and reversible (to some degree). By gradually getting students to put relevant JavaScript source and tests in the same commit we move toward that atomicity. The idea of small, atomic, frequent commits begins to show its benefit once students move on to their final projects - something much larger in scope than smaller weekly assignments. Students then find that these practices help when determining what was done across multiple team members on a project over time. It also allows them to more easily reset their codebase to a previous point in time, should they need to (and they almost always do).
Of course, all of those commits should be toward a singular goal: a larger feature of the application. But what if that feature is no longer desired, or more likely, needs to be put off in favor of higher priority tasks?
Off In Your Own Little World
After my students understand the commit, push, and pull basic concepts we move into more "real world" collaborative development with basic branching and Pull Requests (PRs). The idea of a branch of code is actually not the concept that most of my students struggle with. They typically understand why branching is good: you can work on your own stuff without impacting others, then add your stuff to their stuff later on, once it's done.
Instead, I ran into these questions, which really reflect some of the earlier questions about commits:
- When do I create a branch?
- When do I create a Pull Request?
- How do I switch branches without ruining things?
You might notice one thing in particular missing from this list: how do I resolve conflicts? While students ran into many merge conflicts throughout the course, the act of resolving a single conflict was not the issue - this is, once we knew what a conflict was, and the workflow to move past it. And this is really the key, for people new to Git a solid, repeatable workflow is crucial. They need to understand concepts, yes, but there should be a set of rules for the 90% of the time that things go well.
Answering the questions above was similar to answering the questions about commits. You create a branch for a larger collection of units of work. For example, a feature, a bug fix, an efficiency improvement, or a refactoring effort. These classes of work have even less well defined boundaries, which meant we had to spend even more time practicing (and reviewing) branch creation.
Being able to clearly define what work was being done on a given branch easily leads to an answer to number two above: you submit a PR when the collection of work is complete (coded and tested). At this point, the standard workflow mentioned above should take over, whatever that is. Perhaps you require two sign offs for any PR. In any case, this leads into the concept of merging branches.
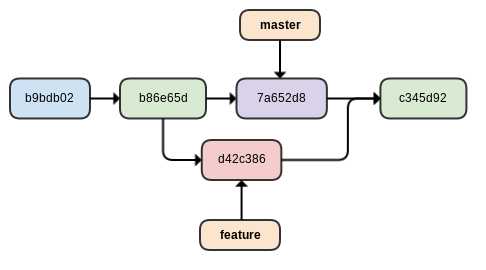
The issue with merging branches begins with students' complete fear that they're going to irrevocably harm the project. Basically, they don't believe me when I tell them that Git almost never deletes data - and in fairness, at this point I have not shown them reset or revert. To get them over this fear we explore the log: before and after a merge. We see exactly what happened, and we discuss why Git did what it did. I find it very helpful to use actual projects for this, not just an example codebase. In other words, use the students' projects themselves, or a good open source project, not just some "hello world" code.
What a Glorious 'Stache
No, I don't mean that kind of 'stache.
We've all been there: you're chugging along on that feature when the boss comes by and says we need to fix this or implement that, and it's gotta be done yesterday. My students would dutifully create a new branch for the fix (yay!), but they would soon discover that all those changes they are in the middle of came along for the ride. The issue is that Git doesn't maintain multiple different "working directories", there is only one. So when you switch branches, you do not want files that have been changed but not committed!
When you combine this issue - and often times a lack of realization that this has even occurred - with another common issue: using git add ., students quickly run into unstable branches with code committed that they did not intend. This is often followed by extreme panic. Step one is to reassure the student that Git does not delete data and almost everything is recoverable.
To prevent this from happening in the future, I find two things extremely important:
- Run
git statusconstantly. - Use
git stashto hold onto unfinished business.
The first item above is absolutely essential for new people to Git. Checking the status of the repository before and after nearly every command allows the learner to absorb the base workflow of Git through observation. Heck, I still do this.... All. The. Time.

Using the stash built into Git alleviates students from the awful practice of copying code files from their repo onto their Desktop, switching branches, fixing something, switching back, then copying that file from the Desktop back into the project directory. You could argue this is exactly what git stash is doing, but what happens when you want to try fixing that bug three different ways? Or if the changes you need to save are actually 10 different files across three directories? This is when the stash shines!
The one key to using the stash is to "save" your entry with a message, don't just using the default "WIP" message! It's easy, just do: git stash -u save "partial completion of feature X" (the -u tells stash to also hold onto untracked files).
Wrap Up and Takeaways
Git is difficult.
It takes a lot of time to grasp the core concepts, whether you are new to software development or a seasoned vet. But understanding the concepts is what's crucial, anyone can look up a command on Google.
Brief Takeaways
- It's difficult to teach Git in pieces. Hit the core commands, get a high-level overview, then start in on the concepts.
- Git is distributed, meaning there are multiple copies of things, but you have to
pushandpullto sync those copies. - A commit is a "unit of work", a branch is a collection of those toward a larger feature.
- Merge branches as soon as features/fixes (branches) are done; a simple, repeatable workflow is key for new users.
- Use
git statusall. the. time. - Git almost never deletes data. Explore the log, learn what it's doing.
- Use
git stashto save work when hopping branches.